Call Us
+86 20 86833226
Air to water heaters are gradually favored by many consumers with safe performance and environmentally friendly equipment. However, when purchasing air source heat pump units, people know very few installation methods about them. If the installation improperly affects the operation of the host equipment.
There is a saying called " 30% base on product, 70% base on installation" No matter where is the slack can lead to the safe operation of the entire system. Below are the professional installation steps:
(1) Installation of the heat pump
1. The installation of the air source heat pump is the same as the installation of the outdoor unit of the air conditioner. Can be installed on exterior walls, roofs, balconies, and floors. The air outlet should avoid the windward direction.
2. The distance between the heat pump unit and the water storage tank should not exceed 5 meters, and the standard configuration is 3 meters.
3. The distance between the heat pump unit and the surrounding walls or other obstructions should not be too small.
4. If the rainproof shed is installed to protect the main unit from wind and sun, care should be taken to ensure that the heat absorption and heat dissipation of the unit heat exchanger are not obstructed.
5. The main unit should be installed in a solid foundation and ensure that it is installed upright and fixed with anchor bolts.
6. Do not install the display panel in the bathroom to avoid moisture.
(2) Installation of the storage tank
1. The storage tank can be installed outdoors with the outdoor unit of the heat pump, such as balcony, roof, floor, or indoors. The water storage tank must be installed on the ground. The foundation of the installation is solid and must bear a weight of 500kg. It cannot be hung on the wall.
2. Valves are installed near the storage tank and at the interface between the water pipe and the hot water pipe.
3, The safety valve of the water tank hot water outlet pressure drop is a pressure relief phenomenon, play a protective role, just take a drain pipe.
(3) Waterway connection
1. Connect the PP-R pipe to the water storage tank according to the diagram and seal it with the raw material tape.
2. Connect one end of the check valve to the water pipe and the other end to the water inlet of the storage tank.
3. Fill the water: Open the tap water inlet valve and open the tap in the hot water pipe. Start filling the water until the water tap overflows, and close the tap. Store water for leak detection to ensure no water leakage. Note: For the first time, you must ensure that the water in the storage tank is full before plugging in the power.
(4) Heating pipe connection
1. Drill a Ф70 pipe hole in the wall between the storage tank and the heat pump unit. The hole should be slightly inclined to the outside. Wrap the connecting tube and the cable of a certain length with a plastic cable ties, pass through the drilled pipe hole, and put the wall pipe sheath on both sides.
2. Remove the caps on the thick and thin connecting pipes of the water tank, screw the thick and thin connecting pipes to the joints on the thick and thin connecting pipes of the storage tank, and tighten them with a wrench.
3. Unscrew the cap of the thick and thin connecting pipes port of the high pressure valve and the low pressure valve of the heat pump unit, screw the other end of the thick and thin connecting pipe to the refrigerant inlet of the water tank, and the pipe of the thick and thin connecting pipe of the refrigerant outlet, and tighten with a wrench. (Note: The thick pipe connects the three-way valve to the upper connecting port of the water tank). Note: Try not to bend the copper tube, even if it is twisted, do not bend or break the copper tube.
(5) Pipeline exhaust
1. Remove the cap from the adjustment port of the low pressure valve and high pressure valve.
2. Connect the vacuum pump interface to the fluorine injection port.
3, To ensure that the vacuum is qualified, the pumping time is not less than 20 minutes. If it is not convenient to evacuate, you can empty the refrigerant and leak detection.
4.Use the inner six wrench to turn the spool of the low pressure valve and high pressure valve counterclockwise until fully open. Replace all caps and tighten them.
5. Leak detection: Check the connecting port of the pipes and the caps with soapy water for leaks. If they are, they must be tightened with a wrench until they are not leaking. No leakage is allowed.
Note: Air entering the system can cause the compressor to malfunction.
(6) Electrical connection
1. The socket must be grounded.
2. The capacity of the power socket should meet the current power requirements of the heat pump unit.
3. Do not place other electrical equipment around the power socket of the unit to avoid tripping the leakage protection plug.
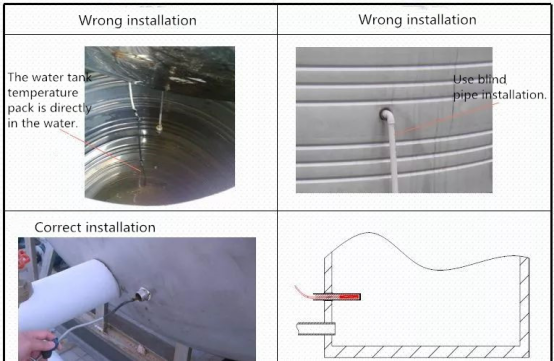
4. Install the water temperature sensor probe into the probe tube in the middle of the water tank and fix it.
In short, the installation of the split type air source heat pump is more complicated. It is recommended that the installer have considerable experience in air conditioner installation.
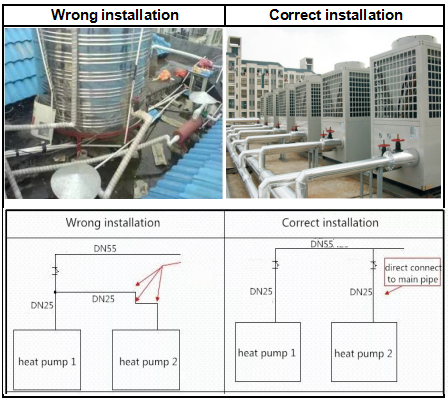
1.the pipeline and accessories: horizontal and vertical, reducing water resistance.
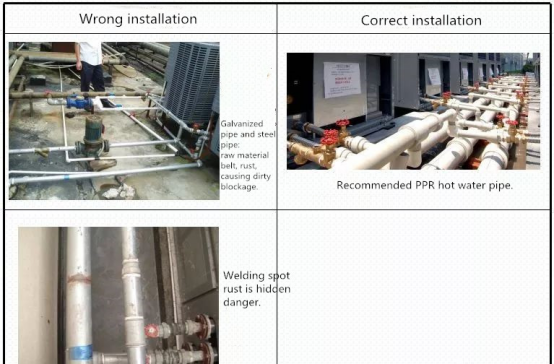
Selection of pipe materials
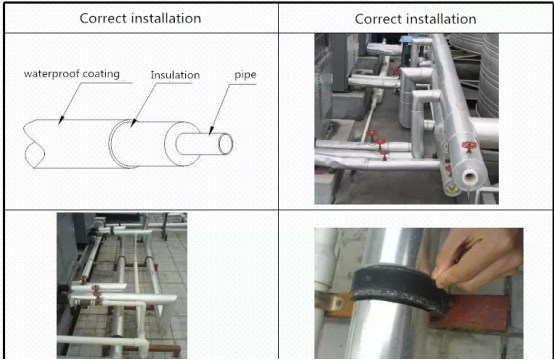
Water pipe insulation and corrosion protection
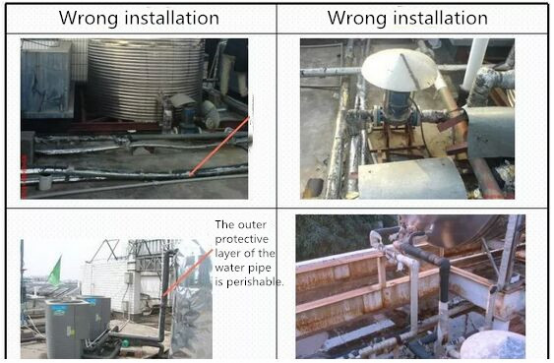
2.the water tank and accessories: water tank sensor blind tube installation
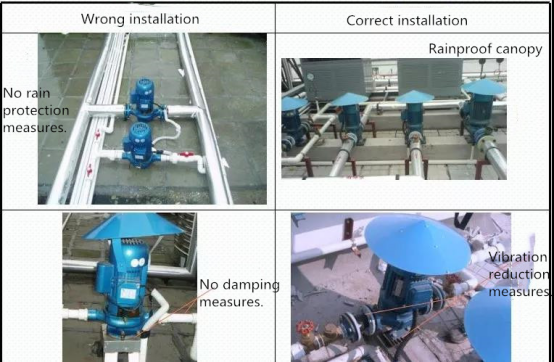
3.the pump installation: rainproof and vibration reduction
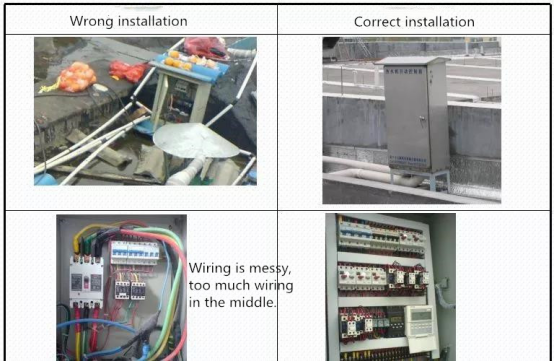
4.electrical installation: electric control box to do waterproof, wiring specifications
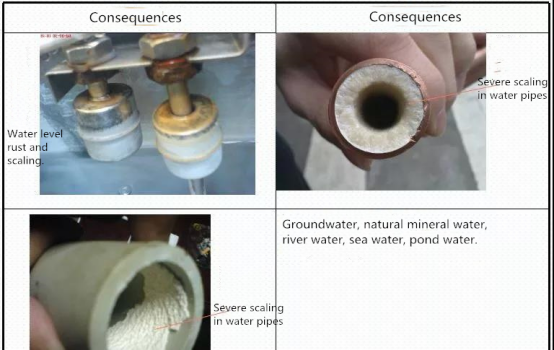
5.Water quality requirements: poor water quality - groundwater
版权所有©2025 Nulite New Energy(广州)有限公司| www.nulitegroup.com保留的所有权利设计